Jeweled Pine Tree Block

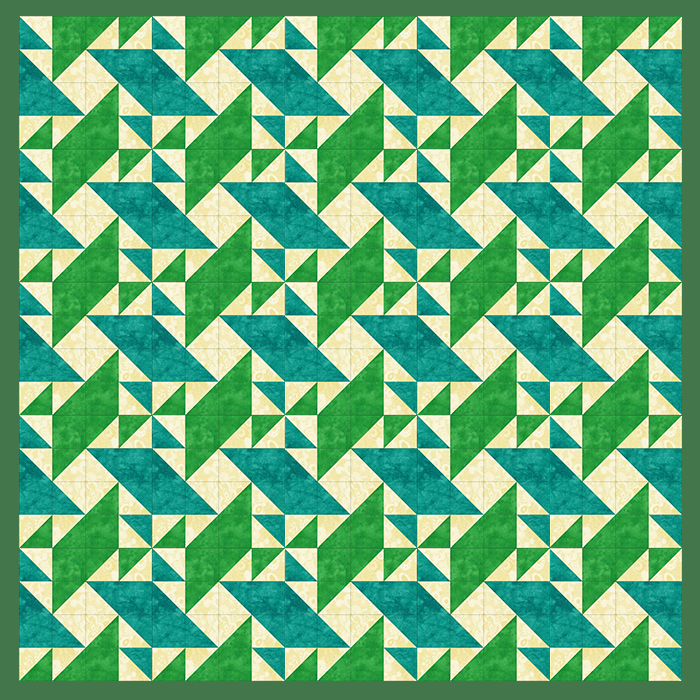
When this block is isolated, it looks like pine trees viewed from the ground looking up. When you put several of them together you get mini-pinwheels and large parallelograms that look like gems. The pine trees remind me of camping and that's what summers in Alaska are all about. Camping, fishing, gardening, and anything else we can think of to do outside.
Fabric
Fabric A - Tan
Fabric B - Light Green
Fabric C - Dark Green
AccuQuilt GO! Dies
8" Block
Cut 12 - 2 1/2" half square triangles from Fabric A - Use GO! Half Square-2" Finished Triangle Multiples (55063); or GO! Value Die (55018).
Cut 6 - 2 1/2" half square triangles from Fabric B - Use GO! Half Square-2" Finished Triangle Multiples (55063); or GO! Value Die (55018).
Cut 6 - 2 1/2" half square triangles from Fabric C - Use GO! Half Square-2" Finished Triangle Multiples (55063); or GO! Value Die (55018).
Cut 2 - 2 1/2" squares from Fabric B - Use GO! Square-2 1/2" Multiples (55059); or GO! Value Die (55018); or create them by cutting 2 1/2" strips with the GO! Strip Cutter-2 1/2" (55014 or 55017), and then rotate the strips 90° and cut them again on the same 2 1/2" strip cutter or use a rotary cutter to sub cut squares.
Cut 2 - 2 1/2" squares from Fabric C - Use GO! Square-2 1/2" Multiples (55059); or GO! Value Die (55018); or create them by cutting 2 1/2" strips with the GO! Strip Cutter-2 1/2" (55014 or 55017), and then rotate the strips 90° and cut them again on the same 2 1/2" strip cutter or use a rotary cutter to sub cut squares.
 12" Block
Cut 12 - 3 1/2" half square triangles from Fabric A - Use GO! Half Square-3" Finished Triangle (55009); or GO! Bountiful Baskets (55048)
Cut 6 - 3 1/2" half square triangles from Fabric B - Use GO! Half Square-3" Finished Triangle (55009); or GO! Bountiful Baskets (55048)
Cut 6 - 3 1/2" half square triangles from Fabric C - Use GO! Half Square-3" Finished Triangle (55009); or GO! Bountiful Baskets (55048)
Cut 2 - 3 1/2" squares from Fabric B - Use GO! Square-3 1/2" (55006); or cut 3 1/2" strips with the GO! Strip Cutter-3 1/2" (55032), then rotate the strips 90° and sub cut into 3 1/2" squares
Cut 2 - 3 1/2" squares from Fabric C - Use GO! Square-3 1/2" (55006); or cut 3 1/2" strips with the GO! Strip Cutter-3 1/2" (55032), then rotate the strips 90° and sub cut into 3 1/2" squares
Rotary Cutting
8" Block
Cut 6 - 2 7/8" squares for half square triangles from Fabric A
Cut 3 - 2 7/8" squares for half square triangles from Fabric B
Cut 3 - 2 7/8" squares for half square triangles from Fabric C
Cut 2 - 2 1/2" squares from Fabric B
Cut 2 - 2 1/2" squares from Fabric C
12" Block
Cut 6 - 3 7/8" squares for half square triangles from Fabric A
Cut 3 - 3 7/8" squares for half square triangles from Fabric B
Cut 3 - 3 7/8" squares for half square triangles from Fabric C
Cut 2 - 3 1/2" squares from Fabric B
Cut 2 - 3 1/2" squares from Fabric C
Assembly Instructions
 1. Assemble six Fabric A and Fabric B half square triangles and assemble six Fabric A and Fabric C half square triangles. Refer to the Half Square Triangles from Squares diagram if using rotary cut pieces or visit the Half Square Triangles Quilting Basic Section for more information.
2. Finger press the seam allowances toward the darker fabric and trim dog-eared corners, if needed. Double check measurements of the half squares. If doing the 8" block, your half squares should measure 2 1/2" unfinished. If doing the 12" block, your half squares should measure 3 1/2" unfinished. If the square ended up too small, check your seam allowance is a scant 1/4" or if it was too big, trim down.
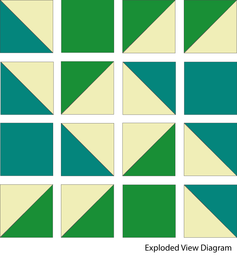
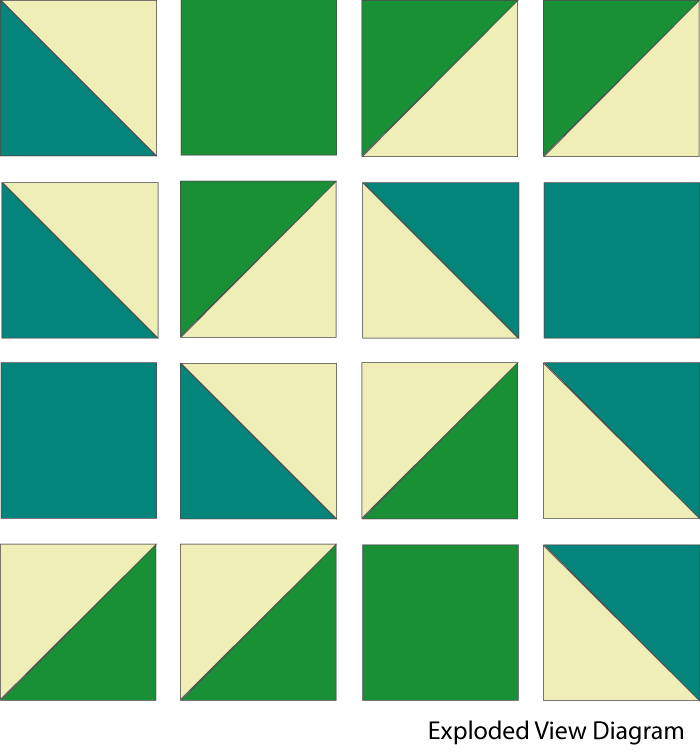
3. Arrange the squares and half square triangles as shown in the Exploded View Diagram.
4. Starting with the first row, align, pin and sew the squares and half square triangles together to form the first row. Sew the remaining rows in the same manner.
5. Press the seam allowances of each unit in opposite directions to make it easier to nest the seams.
6. Match the seam lines in the first and second rows, nesting the seams then pin. Sew the first and second rows together. Continue to add the remaining rows in this manner. Press the block on the back then the front.
Leave a Comment